13 December 2024
Categories: Knowledge Tags: calibration certificate master test gauge pneumatic comparator pressure gauge calibration pressure test gauge recalibrated recalibration standard test gauge super test gauge test gaugesA pneumatic comparator is a precision instrument used for the calibration and testing of pressure gauges, transducers, and other pressure-sensitive devices. It is designed to compare an unknown pressure to a known reference pressure, enabling the user to determine the accuracy and reliability of the device being tested.
History
The history of the pneumatic comparator dates back to the early 20th century and involves the contributions of various inventors and engineers. Its roots can be traced back to the early concept of pneumatic amplification, where changes in pressure were used to detect and amplify small variations in mechanical systems. This principle was explored and refined in the late 1800s and early 1900s.
Throughout its history, the pneumatic comparator has been a crucial instrument in many industries. Its ability to provide highly accurate measurements through the use of compressed air or a vacuum has helped industries maintain quality control and ensure the accurate calibration of measuring instruments such as pressure gauges.

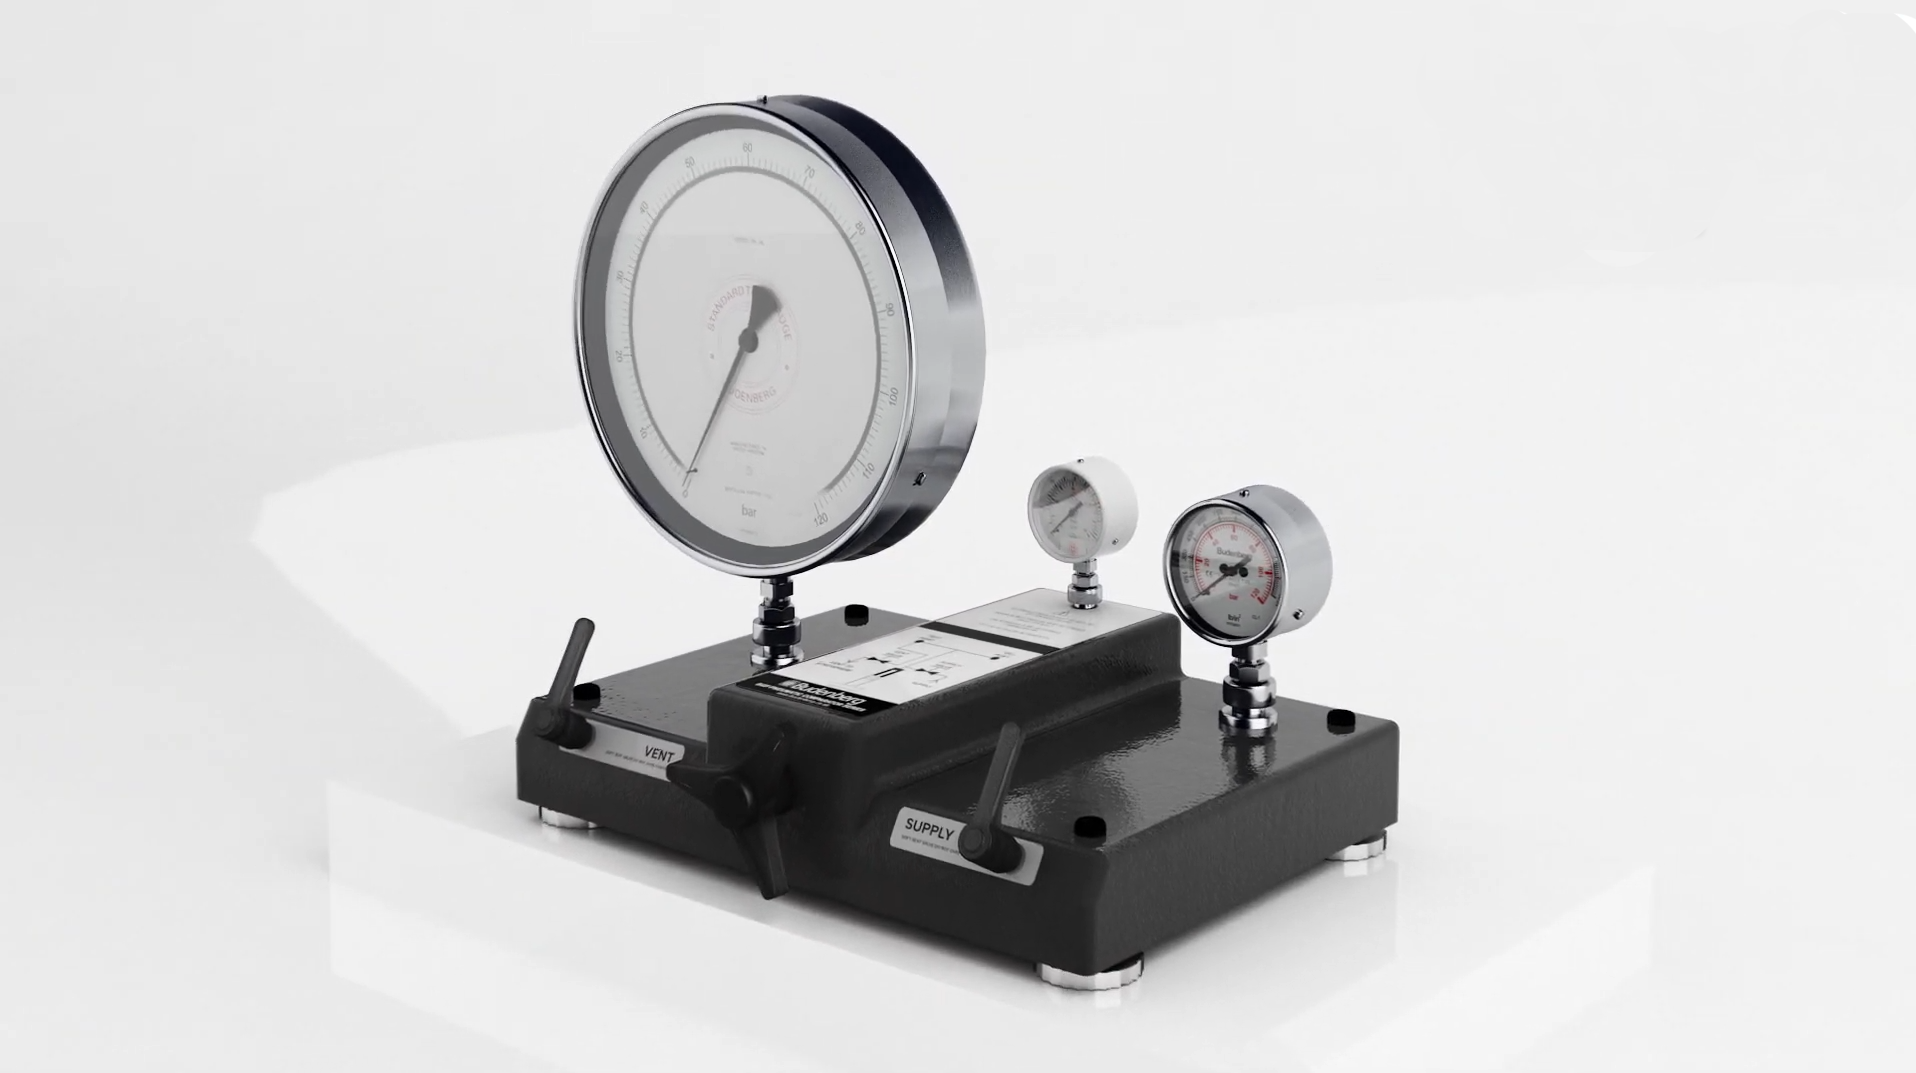
Example of a Pneumatic Comparator
Components, Setup and Operation of a Pneumatic Comparator
Components
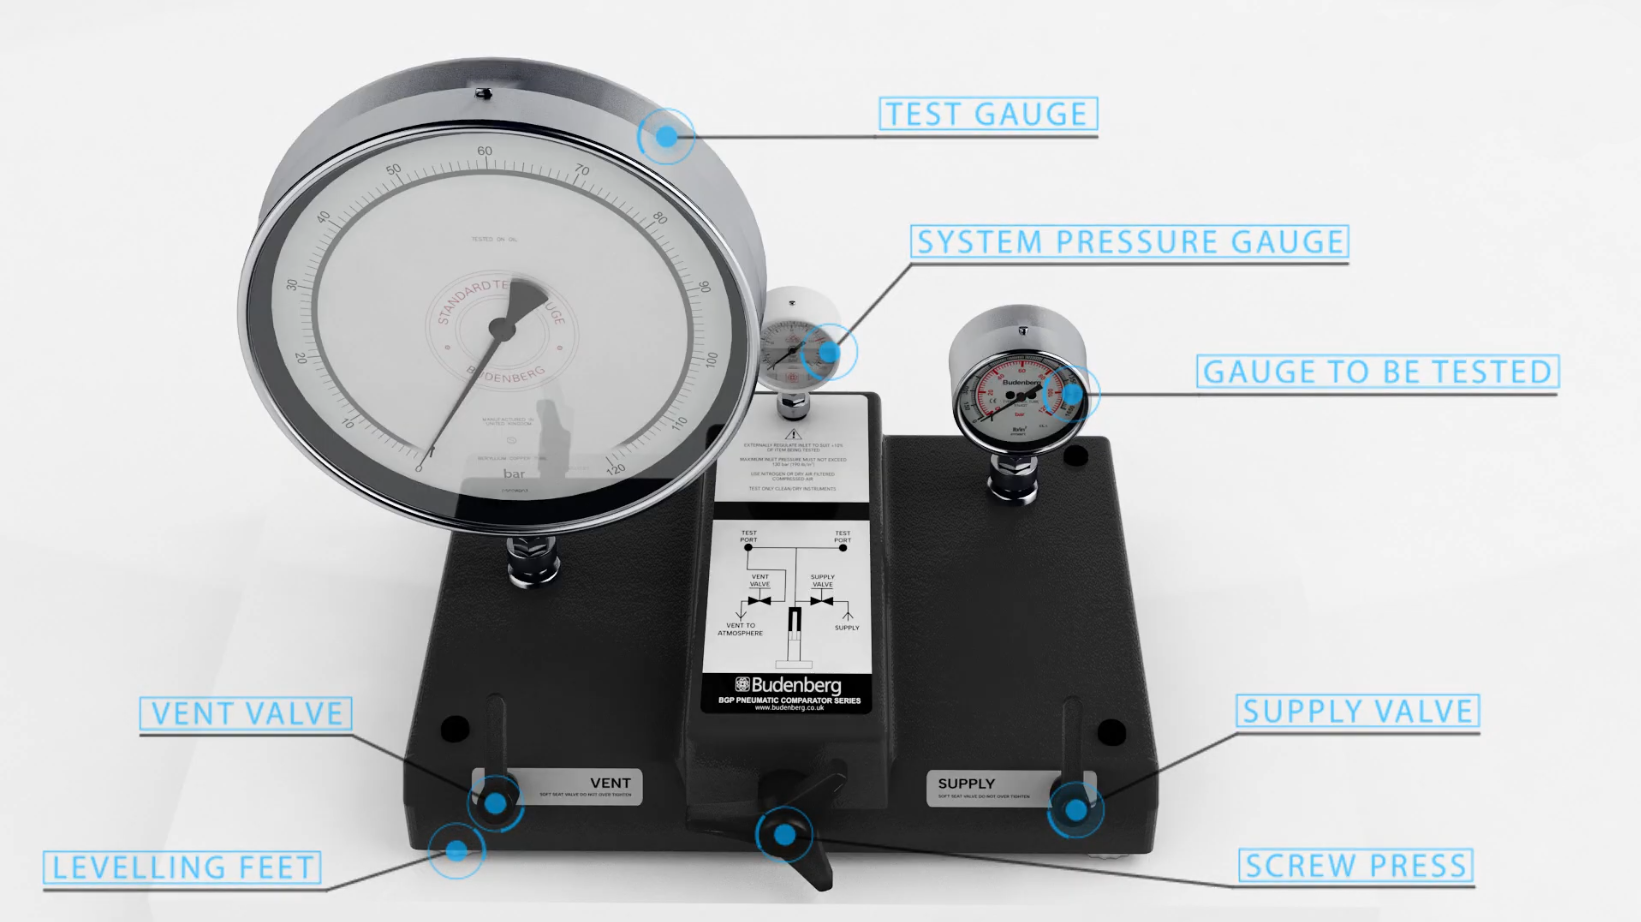
A typical pneumatic comparator consists of a pressure regulator, an air supply source, a system pressure gauge, a test port for connecting the device under test (DUT), and a precision reference pressure gauge (also called a test or master gauge). If using a Budenberg Pneumatic Comparator then the test gauge and the gauge under test can be used on either port.

Components used in a Pneumatic Comparator
Set-up
1. Place the unit on a level bench.
2. Use a spirit level to adjust feet on each corner to the level unit.
3. Connect the instrument to be tested, the reference measuring instrument and the system pressure gauge (If required). Either port can be used for the reference and test instruments.
4. Connect external pressure/vacuum supply to the back of the unit.
5. Make sure that the supply valve is closed (by rotating clockwise) and the vent valve is open (By rotating anti-clockwise) before the unit is pressurised. Make sure that screw press is at its mid -position and the gas/vacuum supply is properly regulated.
System Pressure Gauge
The air supply source provides a controlled and stable pressure to the test gauge, establishing the reference pressure.
Operation
1. To increase pressure, first close the vent valve by rotating clockwise.
2. Then slowly open the supply valve slowly by rotating anti-clockwise.
3. As you approach the desired pressure, close the supply valve by rotating clockwise.
4. To reach the exact pressure point, close the supply valve by rotating clockwise. Then rotate the screw press clockwise or anti-clockwise to reach the precise pressure point required. As an extra indicator, you can also view the system pressure gauge to see when the pressure is reached.
5. To decrease the pressure, first open the vent valve slowly by rotating it anti-clockwise.
6. When the desired pressure is nearly reached, close the vent valve by rotating it clockwise.
7. When the vent valve is closed, slowly rotate the screw press clockwise or anti-clockwise to reach the exact pressure point.
8. After the test is finished, slowly open the vent valve to decrease the pressure to zero.
Comparison
The device under test (DUT) is connected to the test port, and the pressure at its inlet is compared to the reference pressure shown on the test gauge.
Adjustment
If the DUT's pressure reading differs from the test gauge's reference pressure, adjustments can be made to calibrate the DUT accordingly.
Industries that Use Pneumatic Comparators
Pneumatic comparators are commonly used in various industries, including:
Manufacturing: In manufacturing plants, pneumatic comparators are used to set pressure relief valves, check valves, calibrate pressure gauges, transducers and transmitters installed in equipment and instruments.
Oil and Gas: The oil and gas industry relies on pneumatic comparators to calibrate pressure sensors, pressure gauges and set pressure relief valves used in drilling, production, and refining processes.
Aerospace: Pneumatic comparators are utilised to calibrate pressure gauges, sensors and transducers in aircraft systems and components.
Automotive: In the automotive industry, pneumatic comparators are used to calibrate pressure gauges and transducers in engines, suspension systems, and other critical components.
Why use a Pneumatic Comparator rather than a Pneumatic Deadweight Tester?
Where the accuracy is not as critical and a quick reference check is required especially when equipment with accuracy 1% or less.
They also offer quicker calibration processes since the setup and adjustments are generally simpler and faster.

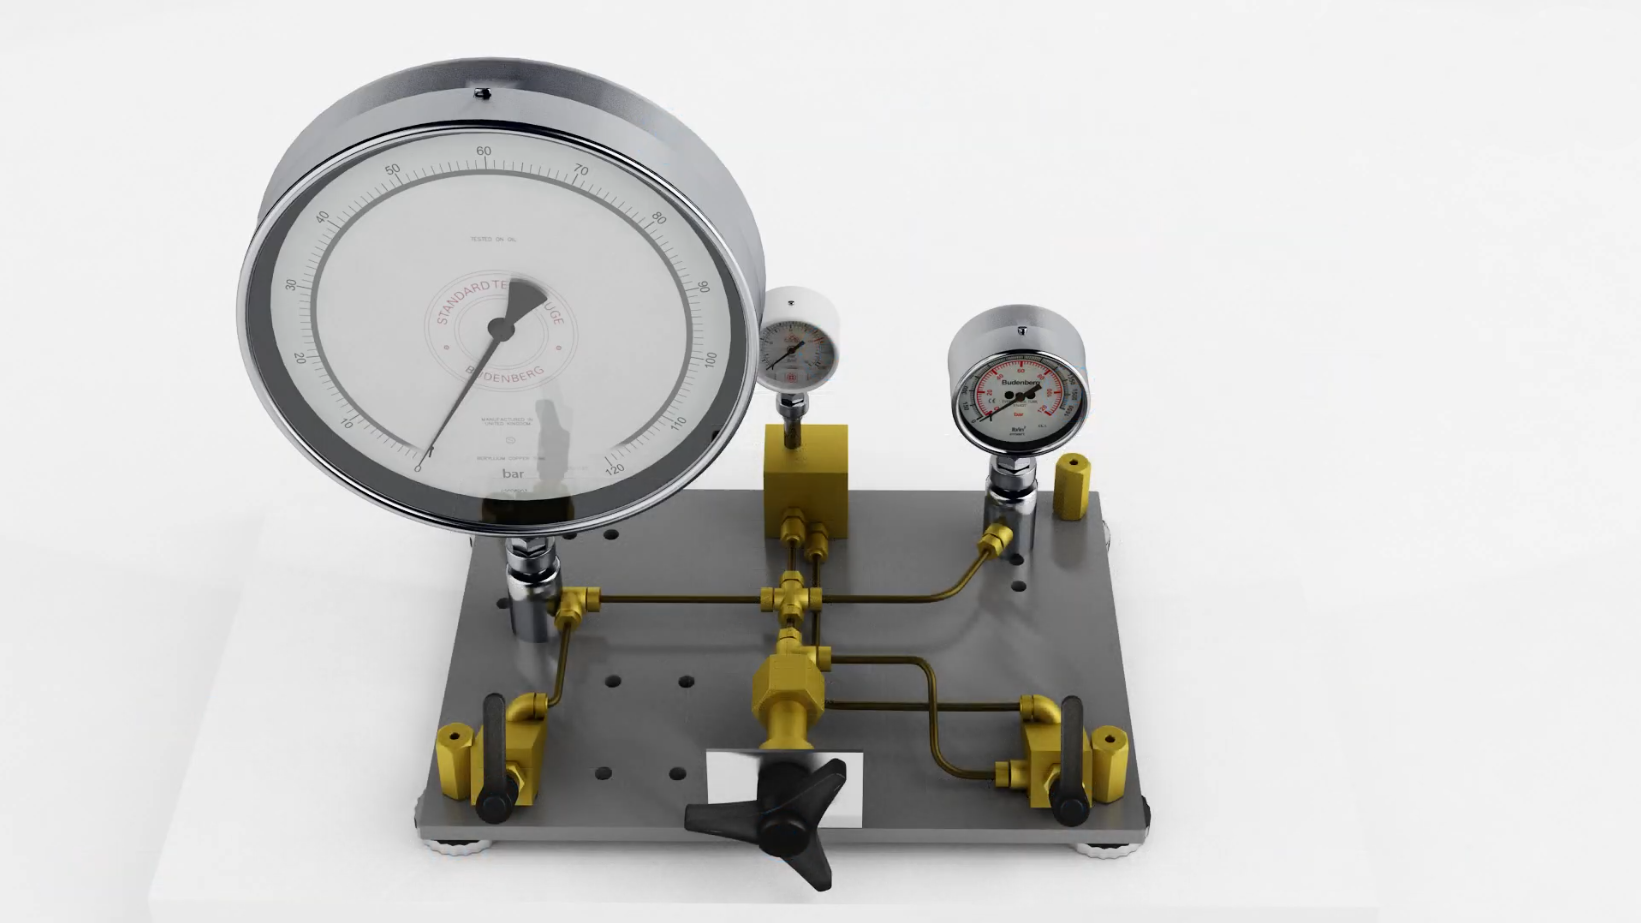
Interior View of a Pneumatic Comparator
Why use a Pneumatic Deadweight Tester rather than a Pneumatic Comparator?
Where the instrument being checked has an accuracy better than 1%, when UKAS (ISO17025) certification is required as the Dead-Weight Tester is a primary standard, a pneumatic comparator uses a secondary standard as the reference - either digital gauge or test gauge.
Budenberg Pneumatic Comparators
Budenberg Gauge manufactures a pneumatic comparator (BGP120C) that generates pressures of up to 120 bar (1600 lb/in²). It incorporates two union connectors, one for a test instrument and one for the instrument to be calibrated. A strong aluminium base as shown in the image above, is used, along with a robust ABS cover. To adjust the level of the unit four adjustable feet are incorporated into each corner.

Budenberg Gauges Pneumatic Comparator BGP120C
The pressure entry is at the back and screwed internally with a 1/4” BSP connector. It is also supplied with 1/4” BSP male to 1/4” NPT female adapter. One Soft Seat valve admits air into the system from the supply and the other vents the system to the atmosphere.
The screw press is fitted to make fine adjustments of pressure with great ease and there is a system pressure gauge that is fitted to the adjuster block to indicate approximate pressure. The unit also comes complete with tool roll and manual.
In summary, pneumatic comparators are valuable instruments for calibrating and testing pressure-sensitive devices in various industries. They offer portability, faster calibration, reduced contamination risk, and environmental benefits. However, they may have limitations in terms of accuracy of instruments being tested compared to pneumatic dead-weight testers. The choice between the two depends on the specific calibration requirements, accuracy of the devices being tested and whether UKAs traceability is required.
If you would like further advice or would like to purchase a pneumatic comparator, contact Budenberg Gauges technical team.
Your details will not be shared with any organisation outside of Budenberg Gauge Co. Ltd. You may request to be removed from our database at any time.
To see our full privacy policy click here.
Budenberg Gauge Co Ltd is a premier manufacturer of instrumentation for a wide range of applications and markets. Quality and reliability have become the trademark of all Budenberg products and all our instruments are supplied with a standard warranty and carry a unique serial number for traceability purposes.